DuttonOwners
NTS Autoparts fast response vehicle
For those days when your parts just can't arrive quick enough, for sunny days when the transit just isn't 'fun'...
Project X...
Coming soon to a shed near me.
1997 DOHC, weber TC, MT75 box and Sierra fixed 3.72 diff in a Phaeton 3/4 hybrid.
I did some playing on gear calc and the theoretical stats look like this.
| Gear | Mph per 1000 RPM | Mph @4000 RPM | Mph @6000 RPM |
| 1 | 4.91 | 20 | 29 |
| 2 | 9.17 | 37 | 55 |
| 3 | 14.24 | 57 | 85 |
| 4 | 19.08 | 76 | 114 |
| 5 | 23.27 | 93 (buttock clench) | 140 (new pants) |
Adrian Southgate
Just found out I can get four point harnesses, fixed and inertia reel seat belts - in different colours too.
Oct 25, 2016
Steve Kerswell
nah, but he got a line in meat pie's :-)
Oct 25, 2016
Adrian Southgate
Hope to get confirmation on those tomorrow... and the poly bushes.
What do you need old bean?
Oct 25, 2016
Steve Kerswell
Ade, as discussed earlier:http://www.locostbuilders.co.uk/viewthread.php?tid=206859
Nov 26, 2016
Adrian Southgate
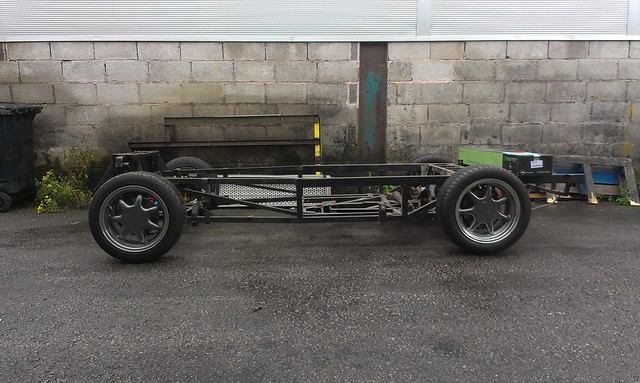
Project X is now rolling again. Still working on the front rims but here is a peek at the backs. I'll try and find the photo from when I started them back at the end of 2016 for comparison.
Aug 10, 2017
Steve Kerswell
they look good to go Ade. SP Sports were the tyre when I was a (fast) Mini boy :-) Size of rims Ade?
Aug 10, 2017
Big Vern
thats a long time ago Steve :)))) These days Federal 595 rsr seems to be the way to go for quick on a budget
Aug 10, 2017
Steve Kerswell
Think it was mid 70's
Aug 10, 2017
Big Vern
16v Dohc in bug eye Granada James though I thought they were 2.3L (I have a new one of those if you're interested Ade)
Aug 10, 2017
Big Vern
@SteveK ah the 70's, my dad told kme about them LOL
Aug 10, 2017
Adrian Southgate
@ Steve - They are 7x15 rims with 205/50 and they still make the tyres evidently. I could do with a pair of 195's for the fronts but I have a collection of used 15's to chose from now.. The offset is unmeasured but the backs are a different offset to the fronts. Been round tonight slapping some proper paint stripper on the front ones. Both pretty corroded under the powdercoat but they'll spin up to look as good as the backs. I'm trying out a new brand of paint before we start selling it in the shop, that one is 'Bavarian Anthracite' and they do one darker, two lighter including a chrome effect. Waiting on them getting some clear to top it off.
Taking the driveshafts into work tomorrow to clean up and fit new boots after finishing off the brake master cylinder recon for the chap from Enwins motor channel and his Quantum.
Whats the score with the DOHC Steve? full car or just the lump?
Aug 11, 2017
Steve Kerswell
Mazda MX5 engine box and hybrid front suspension. Not to certain on the back end yet, I would like to try MX5 but this live axle is almost brand new, apart from sitting unused for 30 years. Work in progress :-)
Aug 11, 2017
Big Vern
Steve, as you may have already discovered the MX5 rear track is much wider then the b type, Not only would there be considerable body mods to cover the rear wheels but you would need to widen the front track as well to match. If you use the mx5 rear you then you might as well make new front bones to get the wider track. You will always have a compromise on steering geometry due to the different wheelbase but then that existed anyway, still think its a shame not to go down the restoration route on this one though.
Aug 11, 2017
Adrian Southgate
I have decided on tyres for the front rims but as I have a pair of cast off westlakes in the right size they have been fitted just for setting the chassis / engine height. I went for 205/50/15 on the rear and 195/50/15 on the front. It was tipping down so they have yet to be fitted. All four wheels have been tarted up but I wouldn't call them refurbished by any means. They are different, I've not seen many other kits using them.
I moved the engine and box out of the underbench storage area ready to bolt back together so they can then be sized up for mounts, clearance on the sump and cam covers, think it's going to be a snug fit. The original plan was to use a DGAS however this will increase the chance of having to cut the bonnet, something I am trying to avoid. Bike carbs or twin side draughts seem to look a lot more sensible on the Phaeton body. This DOHC is new territory for me as it has an ECU :( Apparently everyone has these now so I suppose i'd better get with the program.
This is the first time I've tried to make a car to fit the image in my head. I was working with more set parameters on the Legerras. This time I feel like I need to do something other than a standard S3/S4. I'll get some pictures of the restoration as it continues. Slow working on two at a time but swapping when you get stuck means no idle hands :)
Sep 12, 2017
Dave Price
Sep 13, 2017
Adrian Southgate
Been and done a bit this afternoon. Put all four wheels back on and rolled the beast outside to turn it round.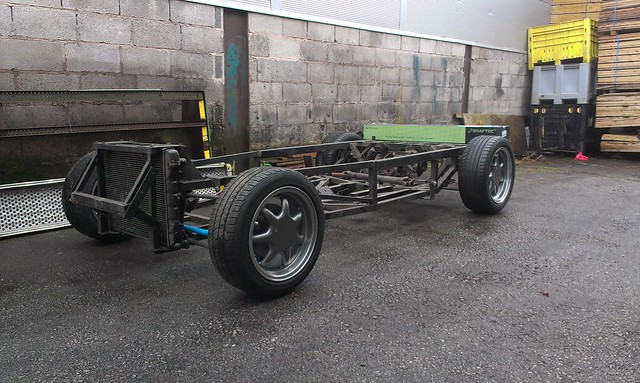
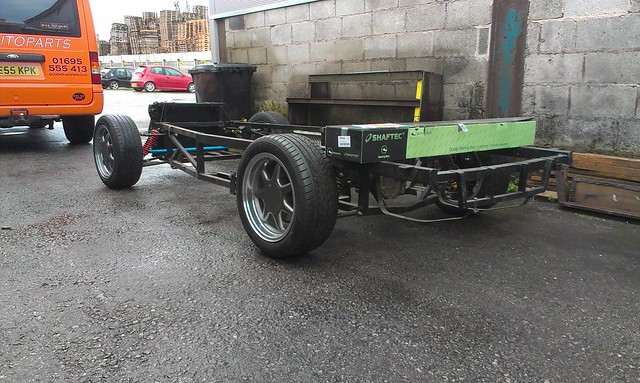
Once it was back in the dry I decided to try the front calipers so dropped the front ones off ... Oops. Calipers bolt on but the discs don't fit. Not enough offset on the disc to clear the caliper. Presume I bought the wrong discs (sigh) Need to go through all the different front disc options now to work out which ones I need.
After that little setback I decided to bolt the engine and box back together and chuck it in the big hole at the front to see if that fitted ... That MT75 is a proper pot bellied box of gears. Even with the engine so far forward that the crank pulley hits the front cross rail, that box isn't a good fit. It looks like I'll have to relocate at least one crossrail either lower under the main chassis (not especially desirable on a low car) or backwards like I did on the Legerra. I'll get some photo's added. Need to see if I still have a haynes manual for a Sierra I guess.
Sep 22, 2017
Adrian Southgate
More progress has now been made.
Engine and box are back together and sitting on trolleys between the chassis rails. Of course there are issues, how could there not be issues.
The MT75 is pot bellied, so of course it hit things. Had a play and now it doesn't hit anything but I do need to make some new bits to hold it in place.
Engine mounts need adapting from 45 degrees two bolt to horizontal one bolt so more bits need making.
The engine has been moved back in the chassis to avoid fouling on the alternator / suspension mounts at the front.
the gear shift on the MT75 now comes up roughly where my elbow should be. Options dwindled as I looked at the problem, wiggled stuff about and looked again. The only solution seemed to be to move the stick forward by about a foot (sigh)
I looked into alternative gear sticks for the MT75 and found one by Spyder engineering that seems to do what I need. It's bulky and made to withstand a nuclear attack on the gear stick ... sadly it's priced for the lotus elan it was designed to fit :( so I decided to make my own. This is the Spyder engineering one.
And this is my solution, still have a couple of bits to fettle in place, a link bar welded to the tube on the selector knob which will fit on the bottom of that clevis yoke and a brace between the two diagonals to prevent twisting.
I have removed the large metal 'flywheel' but retained the rubber donut to help keep things smooth. In the picture above you can see the blue bolt sticking out of the side of the gearbox. That's the old mounting bolt for the shifter extension. I may use that as a secondary gearbox stabiliser, there is one both sides.
Parts list.
300mm M8 316 stainless threaded rod.
M8 clevis fork with clip
M8 bore spacer tubes X2
M12 male rose joint.
M12 sleeve nut
M12 half nut (locking nut)
M12 to M8 'top hat' reducers X2
M8 316 stainless sleev nuts X2
M8 Rubber washers X2
M6 'shoulder' bolt & M5 nut / washers
3mm flat stock for diagonals
old bush crush tube and 8mm flat stock to make the critical little bit that joints the shifter to the selector.
Before I put it all together on the box I'll do measurements, diagrams and costings should anyone wish to replicate it. I'm hoping it will give me a nice, accurate gear shift. I will need to make some sort of reverse lock out as the MT75 can be binned into reverse quite easily without it. The rose joint needs to be packed with grease, I've replaced the dodgy broken selector dust cover with a large ball joint dust boot. I'd like to find some sort of cover for the clevis joint too.
That's it for tonight, hope it helps those of you planning to use the MT75 to make it fit under the S3/4, Melos and Legerra.
Nov 9, 2017
Steve Kerswell
looking good Ade, mine in the Sierra was a bit far back, but I managed, just. If you need a slip joint for the prop, I have one here in very good order, surplus to my requirements now. Poor Elliot who bought my Sierra had to have new prop made and has damaged the gearbox due to prop bolt coming loose at the doughnut. That box was a good box with the Transit high 5th. gear mod. I did manage to use the escort gearbox mount after some faffing. And I used land rover engine mounts as they were small in height but very hard, almost to hard.
Nov 9, 2017
Adrian Southgate
Which bit got damaged? I have a few spare bits including the linkage bracket. If it's the casing then :(
I can still get those gearbox mounts new but they cost me about £17 which is why I was looking at making side mounts.
I didn't realise that the Transit had a higher 5th gear... I know that 1st on my 55 plate is useless.
Didn't think of land rover mounts but will have a look, got Mark from APM Duraflex making a pair with extra long bolts as the alloy engine mount on the DOHC is over 30mm thick.
Nov 9, 2017
Steve Kerswell
on my Btype struggling with gearbox mount position. Could do with a hanging mount. I'm not sure what part has been wrecked, have had no contact for a while
Nov 9, 2017
Steve Kerswell
LINK: http://www.super7thheaven.co.uk/components/mt75-gearbox/
Nov 9, 2017
Steve Kerswell
The correct Link: http://www.fordscorpio.co.uk/mt75.htm
Nov 9, 2017
Adrian Southgate
MX5 gearbox mount?
Nov 9, 2017
Steve Kerswell
it hangs a bit low Ade, trying find something "alternative" :-)
Nov 9, 2017
Adrian Southgate
Be old age that hanging low Steve.... :)
can't even find an MX5 gearbox mount on our system, do you know the reg of the donor car?
Nov 9, 2017
Steve Kerswell
No Ade, not to worry, I'll take a hike to the bearing shop, they do industrial mounts for fans etc. I wonder how Dave Price managed with his RX box?
Nov 9, 2017
Steve Kerswell
in the MX5 kit forum they use an engine mount from the MX5 under the box and use rubber doughnuts on the engine. Those MK's etc. seem to have higher bonnets then the Phaeton type car, so they sit up a bit higher.
Nov 9, 2017
Dave Price
Steve, your comment is very timely. I have a day off tomorrow so in tend to try and finish off the gearbox mount tomorrow. Will post a photo.
Nov 9, 2017
Steve Kerswell
Thanks Dave, I'll hold off throwing a tantrum then :-)
Nov 9, 2017
Big Vern
MX5 doesn't have a gearbox mount as the gearbox connects directly to the PPF. I have seen many fabricated brackets that mount to the bottom of the box and match up to the Ford gearbox mount - it goes where the small stiffener bracket connects between the box and the PPF I have some pictures on my computor at work I'll did them out tomoz
Nov 9, 2017
James Doulton
Getting there, Ade.
Nov 11, 2017
Adrian Southgate
Things will accelerate shortly as the car will be the first occupant of our new 'workshop' in the basement of the shop. Means I can spend time during the day working on the car rather than moving old brake pads from one place to another :( Speaking of which, if anyone out there runs a late 80's or 90's car then let me know. I will be 'job lot' selling some old redundant stock for which I will get peanuts per item. If a few find their way to good homes during the process that i'll be happy with a deal + cost of postage. I may be able to upload a list at some point in the near future to make life easier. I'm off to the unit to make that last fiddly bit in a while, quite excited to see if my theories work in practice.
Nov 12, 2017
Adrian Southgate
The 'workshop' is primarily for doing those little fiddly jobs that we currently undertake in the street outside, bulbs, wipers, batteries etc, awful jobs to do when it's raining. Having the space to work on a toy is just a bonus. I spend most of my time processing stock anyway so it's not like i'm front of house unless someone is on a day off. Once that stock has been processed, moved or moved on i'll have a bit of time.
Nov 12, 2017
Adrian Southgate
Well that didn't pan out quite the way I wanted.
'Bit' made and fitted, everything nipped up and third - fourth is perfect... sadly all the other gears are out of range.
The pivot point for the stick is too high so as you try to move it sideways in neutral the mechanism binds on itself. I have started on the mk2 but may need another M12 tube nut as the first one is welded into the bracket and it's going to be awkward to remove and re-use it. I may be able to rotate the bracket through 180 degrees and reweld the mounting points though, that will get the existing M12 tube nut to about 30-40 degrees from horizontal and allow the pivot point to be moved down and back, more in line with the centre of rotation. I have already made a new 'link bit' which is totally different, but it needs to be ground to shape. The new link bit is a different diameter of tube which may need a cap welding on and a rubber sleeve between it and the selector knob to help stop vibration.
I can't work out how the spyder engineering one works now, thought I had it sussed but it didn't work.
I Don't see how that assembly can rotate the selector as the pivot point is out of line.
Nov 12, 2017
Adrian Southgate
Bit more done tonight but like a womble I forgot my phone so no pics.
MK2 gear stick now functions in all six gear positions but there is a little play in the selector / 'made up bit' joint that needs a thin rubber or polyurethane sleeve just to help keep the rattles at bay. Its adjustable both at the pivot rose joint and the bottom clevis fork which is good because a 1 mm washer makes all the difference between being able to select gears and not. I think 2 or 3 may end up being used in the end.
The inner rod is only M8 threaded 316 stainless so really needs the outer tube to be one bit and also threaded on to help add rigidity. If I can find the right spacer bushes then I may go for a mk3 using M10 and dispense with the misalignment bushes currently being used. A lathe would make things so much simpler but as I don't currently own one, welded bits will have to suffice. The bracket will need bracing and may also need the two lower mountings adding to stop flex. All in all i'm quite pleased that it now functions, but still got to finish the rest of engine and gearbox mounts before I can test it from a seated position so not really in a position to declare it a complete success. It would be handy to create that reverse lockout too but that may have to be incorporated into the shift gate.
Nov 15, 2017
Steve Kerswell
I have just found a remote that may give an idea or improvement, will post pictures when this thing lets me :-)
Nov 16, 2017
Adrian Southgate
Here goes, photo's for your perusal.
So this was the mark 1, partial success (providing you only needed third and fourth)
and... this is the mark 2, quite stiff to select gears whilst there is no clutch depression, the lever is short and there is a
polybush on the knob end as a temporary safety feature.
The change of position on the pivot made all the difference, it now works in all 6 gear positions. I will have to cap the selector tube and extend it down the bar below then grind back. If I fit this cap with a grease nipple then it can be lubricated without disassembly. The excessive M12 bolt sticking forward from the pivot mount is to double lock the rose joint and will be replaced with a grub screw when they arrive.
At the suggestion of Mr Sheridan I attempted to shoot a video of it in operation... once again a tech fail as I forgot the camera mount so had to operate the shift while holding the camera with the other hand. I don't know if this will work as it's on flickr not you tube. Starting by selecting fifth and banging down the gears it shifts well, short throw and very precise. I do think it's going to need more metal in the pivot mounting bracket, possibly using the blue bolt on the picture above (there is one both sides) which is the original mounting point for the old shift lever extension.
I have now created gearbox mounts as the original Sierra one was cracked and fell into two pieces when removed. These are BMW transmission mounts from a 3 series, apparently made from sponge rubber and very soft. probably make the BMW very quiet but not ideal for this application. Might as well have used mini exhaust bobbins, probably stiffer. Seen from above they are mounted on the diagonal box section which is the only new bit I had to add (so far!) its 20 x 40 mm box left over from a previous project, drilled so the nut is hidden from below and can be concealed with a 20mm grommet. A 13mm 1/4 drive socket fits just right, i'll get a picture from underneath when I lift the chassis to finish the welding.
So there you go, half the mounts in, gear shift sorted. Got to cut and shut the prop next then take it to North West propshafts to be welded properly and balanced. As it's fixed i'm going to be able to get away with a very small prop catcher and tunnel but I will be keeping a UJ on the diff end and the rubber donut on the front just in case the engine and box ever shift suddenly, don't want that bit getting stressed. The finished prop will have to be millimetre perfect as I have no adjustment on those transmission mounts.
Waiting for the next batch of bits to arrive so I can get the steering rack mounted. Why does the steering ALWAYS want to interfere with the engine mounts. More on that little issue next time.
Nov 20, 2017
Adrian Southgate
So, the video was pants... I know. It works as a link, once you've watched the video just click the back button to return to the Ning page.
Nov 20, 2017
Adrian Southgate
https://flic.kr/p/Zo8cUV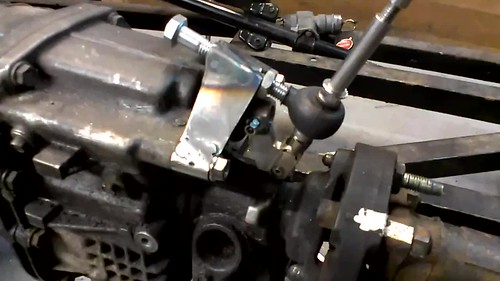
Nov 21, 2017
Paul Sheridan
Video does work Ade. Why does the rose joint have to be at an angle?
Nov 21, 2017
James Doulton
I'm guessing that the pivot point of the gear lever needs to be in line with the centre of the selector shaft.
That looks good Ade. Where did the lever on the end of the selector shaft come from or was it part of the original mechanism?
Nov 21, 2017
Adrian Southgate
@ Paul - trying to get the pivot as close to the centreline of the selector. If I increase the angle i'd have to move the tube back. The mark 1 was designed to have a vertical gearstick as that seemed to work on the type 9 in both the Legerra and the Sierra. If I went much further back I'd run into collision issues with the prop bolts in 1st, 3rd and 5th.
@ James - The tube with the drop arm? Thats made from the crush tube from an anti roll bar to TCA bush and a lump of 8mm bar stock. It is shimmed with a sacrificial sleeve from a Vectra suspension bush, I have a bag full at work and you can make 2 sleeves from each one.
Before I finalise it, I will take it down to component level and do some photo's.
Nov 21, 2017
Paul Sheridan
In my mind it would work a lot smoother if the rose joint was in a horizontal plane. The rose joint will move freely in any single plane, but as you have added an arc into the equation (all be it small) the lever will have to slide in the rose joint.............. Just writing as Im thinking in engineering mode, so dont take any notice of my ramblings ;-)))))
Nov 21, 2017
Adrian Southgate
The slight arc is compensated in the join between the selector and the tube that fits over it. I can reduce this by moving the rose joint backwards, there is over an inch of thread inside the bracket. I think thats where I had it set when I made the bracket but moved it during reassembly. Might help make the shift easier if i remove one washer and drop the rose joint back be one turn.
Nov 21, 2017
Adrian Southgate
Very little time to do this at the moment so only a little progress to report.
Since completing the gear selector modification I have...
Extracted the wrong diff, purchased in ignorance. I bought a 100mm PCD 7 inch diff and it should have been a 108mm 7.5 inch. Sadly they only seem to be fitted to cosworths so not a cheap option.
Reconditioned the driveshafts with new CV joints and boots.
Made the steering work after a fashion, enough to push it around without kicking the front wheels to steer it.
Worked out that by moving the engine back I may have left myself a little short in the footwell department.
Test fitted the bonnet with the new wheels setup only to find it may need a little tweak to cover said wheels.
So with those little teasers posted i'm off to do some more before I get evicted from my nice dry unit. Yes folks, I have to pack all my stuff onto pallets and move house. 4 cars in bits + 3 cars barely mobile, and about 100 boxes full of 'stuff', 20+ body panels ... and of course all the bits that are too big to go in boxes (sigh)
I'll post some photo's if I remember to take some.
Oct 19, 2018
Adrian Southgate
As a side line to restoring old kits I have this little shop called NTS autoparts.
We now have the following items in stock.
Escort TCA's - brand QH
Maxi ball joints - brand QH
Escort mk1 clutch cables - First line and QH
Crossflow and pinto service items, gaskets and other parts.
Type 2, 3 and 9 gearbox rear oil seals.
Wheel bearings for ford and triumph based units.
Triumph upper ball joints for S1 and S2.
Discs, pads and calipers for M16 based cars.
DOC and forum members get 30% off retail
Oct 26, 2018
Adrian Southgate
So, nice day, willing helpers and a trip to the body storage unit. I'd forgotten just how many spares parts are in there to be honest.
As you can see when it's all laid out on the ground it takes a fair bit of space.
S4 outer tub (hacked)
S3 outer tub (hacked)
S2 back end, tubs and bonnet
S2 back panels
S2 back end, tubs and boot floor with front tub
S2 Melos bonnet in red
+ loads of odd ends that i've accumulated over the years... and thats just one of the two lockups. :(
Mission was to collect the red S4 / P21 outer tub and cart that back to the unit on the trailer (too big for the van)
Hour and a half saw it all out and back in again with the salvage in the van and on the trailer.
On arrival back at the unit my willing helpers and I set about moving a few bits out of the way so project X could be married up with it's replacement skin. Needless to say It never fits right first time...
While I had them all out I took this of all three Phaetons.
Lenn, Steve and Martin trying to work out why the red shell sat so high.
Project X had a few extra bits welded in back in the 80's, turns out one of the extra crossmembers was hitting the front of the drop well in the boot, causing it to lift and not go fully forward. Small recip saw fixed that and now the bonnet matches the scuttle (sort of)
It's seriously phat and fat too... All four arches will need extending to cover the wheels but that was expected. It'll give me a chance to play with a little resin and matting. May have to do something about the inner tub (or total lack of it) as well.
Now Project X is beginning to look like a car again. I plan to fill a lot of the voids between the rails with flame retardant foam sandwiched onto the bottom of the new tub. Hopefully this will remove some of the aero issues underneath (sorely needed) provide soundproofing and reduce vibration. Plans also include pockets in the voids on the sides and a much reduced centre tunnel assisted by having a fixed prop and diff.
That's it for now.
Nov 18, 2018
Adrian Southgate
I hid the Melos bonnet in the lockup. :)
Nov 18, 2018
Steve Kerswell
some good kit there Ade, I have a B type that I'm getting pretty peed off with at the moment. Nothing going right, etc. Want another hidden one? :-)
Nov 18, 2018
Adrian Southgate
I think I would die a slow and painful death at the hands of my beloved.
Is there anything I can help with or is it just 'normal dutton' issues?
Nov 18, 2018