Dutton Kit Cars and their owners
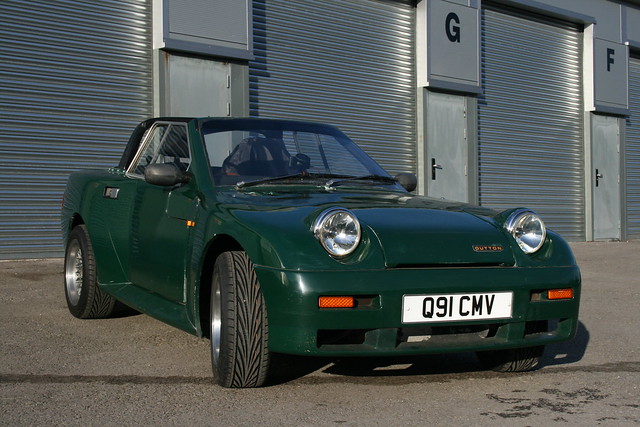
Q91CMV - Dutton Legerra ZS Series 2
So, MOT sorted by the skin of its teeth, loads to do before tomorrow morning, panic has set it due to a little mishap with the pedal box...
How many of you fitted metal spreader plates between the pedal box and the bulkhead? Here is something for those of you with pinto engines to think about.
I didn't see this coming 8 years ago when I re built it... The holes are supposed to be there... the crack around the edge is not.


Seems the proximity to the manifold has weakened the fibreglass of the tub a little
Well a lot actually :)
A metal spreader plate on the inside would have eased the load on the area and this may not have been quite so severe. This is going to be a fun evening..
Add a Comment
-
Comment by Adrian Southgate on June 30, 2014 at 22:15
-
Looking at the last photo the top seems warped, its not real, just camera lens and angle of the body work.
-
-
So, another couple of hours fettling and I have this...


Which when slotted into place looks a little like this...


Now thats all very pretty however I then decided to drill a small hole and blow some air into it. That soon brought to light a few little bits that may have not penetrated properly as it leaked from at least six places. To be honest I saw two before I tried the compressed air. All these were ground back flat, grooved with a cut off tool and re welded. I've stopped for the night without grinding back as my next door neighbour is a baker and goes to work at 2am. Fittings have been ordered and expected Thursday so I have time to re-finish the tank before I have to hack holes in it with a taper drill. Question is, do I leave it brushed or do I buff it?
-
-
Cheers Steve, i'm well chuffed now but we'll see what happens when I do the first hole and pressure test it.
The welds that I intended to cut back have been done twice, once to hold the metal together, flattened and then grooved with the grinder and re seamed. the rest are 90 degree angles. The whole sheet was powdercoated or painted with IT beige, the colour of old 'white' computers which was easy to remove with a flap wheel but is proving a so and so with the DA on the surfaces I want a finish on.
I found that it eats much more wire than steel, had to triple the wire speed and move quite fast to get a 'wave' going. It also doesn't seem to penetrate as far but as the ally doesn't change colour like steel its a bit weird. It also cools a lot faster than steel. I'm going to dig out the half finished sump guard for the Sierra and use whatever gas is left to weld the brackets on that after this is done.
-
-
Another update.
The last few days I have been making stuff that I just couldn't buy. The available header talks were either too big, wrong fittings or stupidly expensive so I decided to make my own.
Started out with a cardboard template stuck together with masking tape.


I had a sheet of 3mm ally and I know I can buy the fittings on ebay so I thought I'd have a go.
Now I've had a lot of pro's tell me ally is a shit to weld with a hobby mig however I did this with my £150 Halfords hobby MIG. Took a bit of getting right but after a couple of wobbles I managed this.


Only two faces are visible when its installed and i'll dress those welds back flat as the tank will be either brushed or polished dependant on how much of the surface is good / bad.
I've ordered a filler cap designed for ally rads which needs to be welded to the top and then bored out, a 20mm weld on barbed pipe for the main feed and a smaller one for the blow hose from the rad. (total cost less than £25) used a whole 'disposable' bottle of Argon (£14) and the rest was stuff from the garage spares. I'll post some more photo's when I finish sanding and welding the fittings on.
-
-
Good idea that Paul, might be worth a shot on the leggy although I don't trust the engine mounts not to snap off... wouldn't be the first time...
-
Comment by Paul Thomas on April 13, 2014 at 18:43
-
if you look at my engine bay you can see I hhave fitted a support from the engine mount to the bulk head. the pedal box spreads the load on the inside and on the outside I have a piece of 1/8 plate between the master cylinder and the bulkhead. This means I can stand on the brakes without fear of the bulkhead giveing away.
-
-
-
-
So 200 miles later I have successfully killed the rad cooling fan and possibly the voltage regulator on the instrument cluster. Fuel and temperature readings have been haywire this weekend however the trip has been completed with a few more hitches than normal, my first trip up Snake Pass and I wanted to go back and do it again. Time to fettle a bit more now as it's obvious that more of the little bushes are going to need replacing soon especially the back ones. Managed to make Sue a couple of times about G force in corners... all good.
-
-
She's now Taxed, Insured and MOT'd. Lets hope it holds together...
I dont need a tow rope, we have minions who carry such common items...
-
-
Its all back together and better than ever. Thanks again Dave, there is no way I would have done that single handed. Now the only worry is just how many tools I can squeeze in the boot :)
About
© 2024 Created by Tim Walker (The Bodger).
Powered by
![]()
You need to be a member of DuttonOwners to add comments!
Join DuttonOwners